Internationalizing a React Native App with i18next and Expo: Part 2

I'm a developer who grew up in Houston, TX. I've done a lot of things in my life and have finally found that software and development is truly what makes me happy.
I've been a musician, a teacher, a flight attendant, and airline pilot, and now a full stack software engineer.
I get to learn about new tech every day. And I'm here to share it all with you.
If you haven't done so already, check out my Part 1 article here, where I walk you through setting up i18next and expo-localization in your React Native App.
In part 1, we learned how to set up i18next and expo-localization in a React Native app with Expo. We used expo-localization to grab the device's system language and use that within our app to display translated text.
But let's take it one step further. What if we want to keep our device in, say, English, but display content in our app in Portuguese? Let's dive in and learn how to set this up with AsyncStorage and a custom UI to change the locale from within our app.
A global context for i18n logic
In the previous post, we mostly relied on expo-localization and set our locale once at the root level, so we didn't need a way to track and change the locale. Now, we do.
We'll use React's context API to create a global context and state to hold our selected locale and all of the functionality to set and retrieve the locale from AsyncStorage. Oh yeah - you'll need to install the package for AsyncStorage.
npx expo install @react-native-async-storage/async-storage
Our context will:
Fetch our stored locale from AsyncStorage or use the system locale if one isn't stored.
Provide the locale to the app.
Provide the function that we'll need to set a new locale.
Export a hook that we use to easily access these provided things.
import { createContext, useContext, useState, useEffect } from 'react';
import * as Localization from 'expo-localization';
import AsyncStorage from '@react-native-async-storage/async-storage';
import i18next from 'i18next';

const I18nContext = createContext({});

export function I18nProvider({ children }: { children: React.ReactNode }) {
  const [locale, setLocale] = useState<string | null>();

  const updateLocale = async (locale: string) => {
    // I like to namespace my localstorage. Prefix with something like
    // your app name ie: hundred_locale
    await AsyncStorage.setItem('hundred_locale', locale);
    i18next.changeLanguage(locale);
    setLocale(locale);
  };

  useEffect(() => {
    if (locale) return;
    const loadLocales = async () => {
      const storedLocale = await AsyncStorage.getItem('hundred_locale');
      if (storedLocale) {
        setLocale(storedLocale);
      } else {
        const locale = Localization.getLocales()?.[0].languageTag;
        setLocale(locale);
      }
    };
    loadLocales();
  }, [locale]);

  return (
    <I18nContext.Provider
      value={{
        setLocale: async (locale: string) => await updateLocale(locale),
        locale,
      }}
    >
      {children}
    </I18nContext.Provider>
  );
}

// Custom hook to use the i18n context
export function useI18n() {
  const context = useContext(I18nContext);
  if (context === undefined) {
    throw new Error('useI18n must be used within an I18nProvider');
  }
  return context;
}
Now, wrap your app with the provider. Mine looks something like this:
function RootLayoutNav() {
  return (
      // Here's our i18n provider wrapping the app
      <I18nProvider>
        <PaperProvider theme={DefaultTheme}>
          <Stack>
            <Stack.Screen name='(tabs)' options={{ headerShown: false }} />
            <Stack.Screen
              name='[id]'
              options={{ presentation: 'containedModal', headerShown: false }}
            />
            <Stack.Screen
              name='language'
              options={{ presentation: 'containedModal', headerShown: false }}
            />
          </Stack>
        </PaperProvider>
      </I18nProvider>
  );
}
hundred_ as a prefix for my locale key. You're not the only one storing "locale" on someone's phone 😀A locale-picking UI
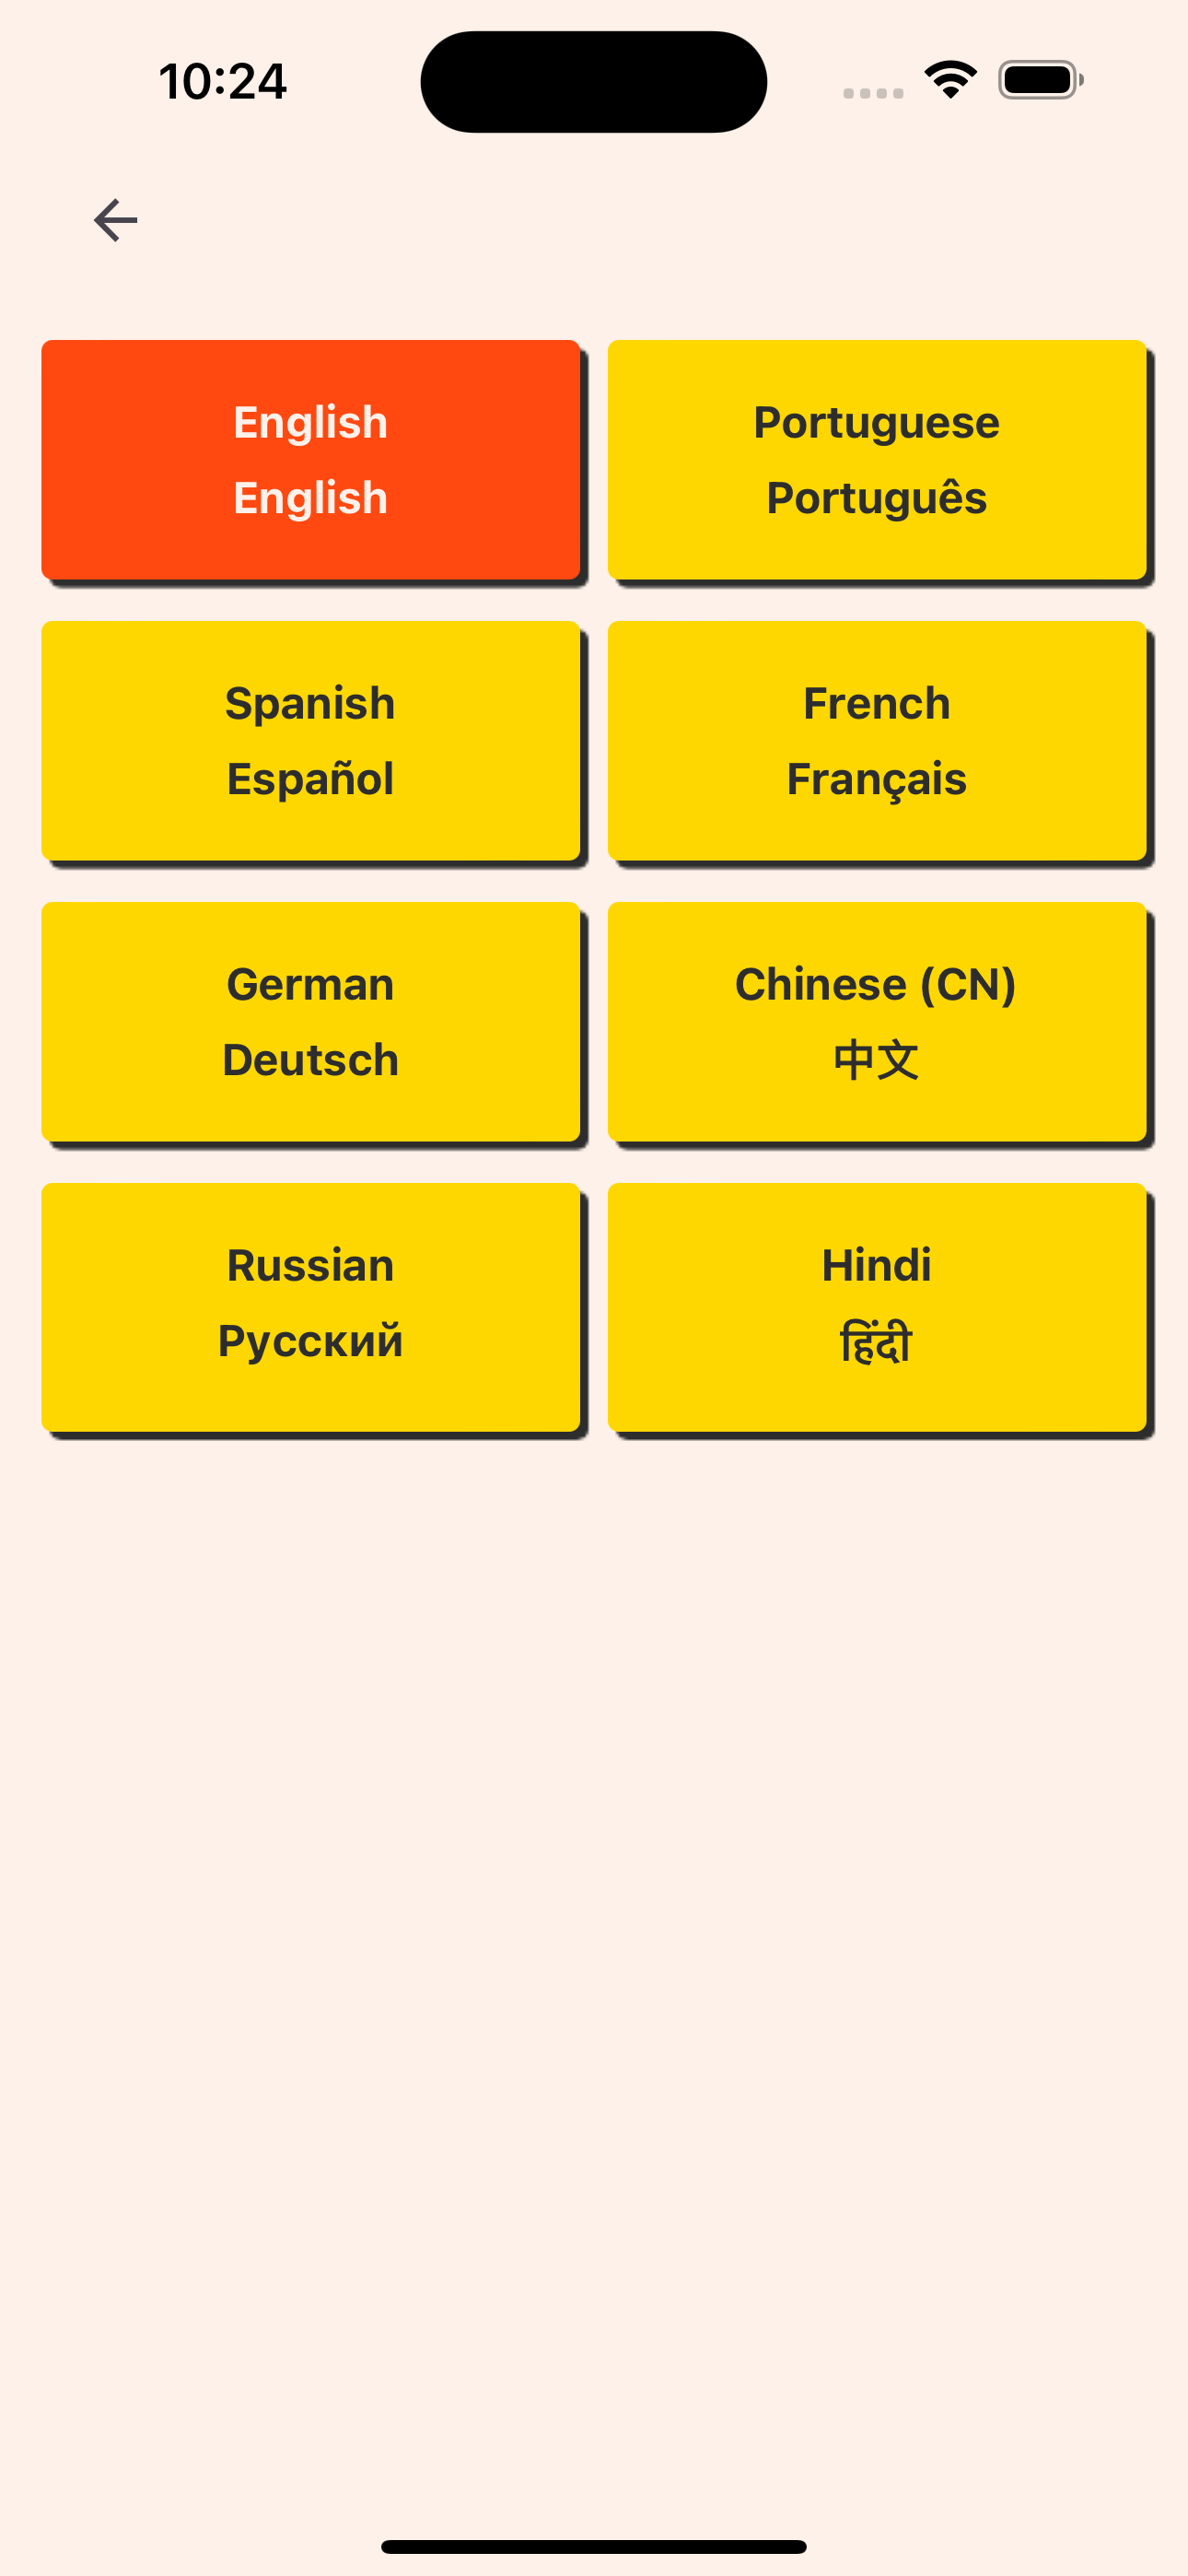
Now we want to choose and set our locale for our app from within our app. We'll need a UI for this.
Let's make a screen called language.tsx. I'm not going to get too much into routing in this post, so that's all up to you. But I'm using Expo's expo-router, which is a file-based router for React Native.
In the UI, we'll need a list of languages to choose from. I went with a simple FlatList that uses an array of language objects. The language object looks like this:
// @/constants/languages.ts

export const languages = [
  { id: 'en-US', value: 'English' },
  { id: 'pt-PT', value: 'Portuguese' },
  { id: 'es-ES', value: 'Spanish' },
  { id: 'fr-FR', value: 'French' },
  { id: 'de-DE', value: 'German' },
  { id: 'zh-CN', value: 'Chinese (CN)' },
  { id: 'ru-RU', value: 'Russian' },
  { id: 'hi-IN', value: 'Hindi' },
];
In the language.tsx file:
// language.tsx

import { router } from 'expo-router';
// Here's our hook that we exported from the i18n context
import { useI18n } from '@/contexts/I18nContext';
import { useSafeAreaInsets } from 'react-native-safe-area-context';
import { languages } from @/constants/languages

export default function Language() {

  // Access our app locale with our custom hook
  const { locale } = useI18n();
  const { top } = useSafeAreaInsets();

  return (
    <SafeAreaView style={[styles.safeArea]}>
      <IconButton
        icon='arrow-left'
        style={{
          position: 'absolute',
          left: 16,
          top: 54,
        }}
        onPress={() => router.back()}
      />
      <View style={{ marginTop: Platform.OS === 'android' ? top + 80 : top }}>
        <FlatList
          data={languages}
          renderItem={({ item }) => <Item item={item} locale={locale} />}
          keyExtractor={(item) => item.id}
          numColumns={2}
          columnWrapperStyle={styles.column}
          ItemSeparatorComponent={() => <View style={styles.separator} />}
          contentContainerStyle={styles.list}
        />
      </View>
    </SafeAreaView>
  );
}

const styles = StyleSheet.create({
  safeArea: {
    flex: 1,
    backgroundColor: Colors.brand.cream,
    paddingHorizontal,
    position: 'relative',
  },
  list: {
    paddingHorizontal: 10,
  },
  column: {
    justifyContent: 'space-between',
  },
  separator: {
    height: 5,
  },
});
Our FlatList takes in our array of language objects and renders 2 columns of <Item /> components. The item will be a Pressable component that will represent each language that we have to choose from.
Add the <Item /> component to the same file, or in a separate one. I'll just add it to our language.tsx file.
// language.tsx

import { useTranslation } from 'react-i18next'

const Item = ({
  item,
  locale,
}: {
  item: Record<string, any>;
  locale: string;
}) => {
  // Here's our hook again, this time we're using the setLocale
  // function from within the context
  const { setLocale } = useI18n();
  const { t } = useTranslation();
  return (
    <Pressable
      onPress={async () => {
        await setLocale(item.id);
      }}
      style={[
        styles.item,
        {
          backgroundColor:
            locale === item.id ? Colors.brand.tertiary : Colors.brand.primary,
        },
      ]}
    >
      <Text
        style={[
          styles.title,
          {
            color:
              locale === item.id ? Colors.brand.cream : Colors.brand.charcoal,
          },
        ]}
      >
        {t(`language_name.${item.id}`, { lng: locale })}
      </Text>
      <Text
        style={[
          styles.title,
          {
            color:
              locale === item.id ? Colors.brand.cream : Colors.brand.charcoal,
          },
        ]}
      >
        {t(`language_name.${item.id}`, { lng: item.id })}
      </Text>
    </Pressable>
  );
};

// ....other code from above example

const styles = StyleSheet.create({
  safeArea: {
    flex: 1,
    backgroundColor: Colors.brand.cream,
    paddingHorizontal,
    position: 'relative',
  },
  list: {
    paddingHorizontal: 10,
  },
  column: {
    justifyContent: 'space-between',
  },
  // Item styles
  item: {
    gap: 8,
    alignItems: 'center',
    padding: 20,
    marginVertical: 5,
    flex: 1,
    marginHorizontal: 5,
    borderRadius: 4,
    shadowColor: Colors.brand.charcoal,
    shadowOpacity: 1,
    shadowOffset: { width: 3, height: 3 },
    shadowRadius: 0,
  },
  title: {
    fontSize: 16,
    fontWeight: 'bold',
  },
  separator: {
    height: 5,
  },
});
So, when a user taps on one of the languages, the locale associated with that item will be saved into async storage.
Refactor our _layout to pull from AsyncStorage
If we have a locale set in local storage for this app, let's make sure it takes priority over the system language when our app launches. To do this, we'll make a check in the root _layout.tsx file to check our local storage first.
Our updated _layout.tsx file:
// _layout.tsx

import { useState } from 'react'
import i18n from 'i18next'
import * as Localization from 'expo-localization'

import en from '@/services/i18n/en-US.json';
import pt from '@/services/i18n/pt-PT.json';
import ru from '@/services/i18n/ru-RU.json';
import zh from '@/services/i18n/zh-CN.json';
import es from '@/services/i18n/es-ES.json';
import fr from '@/services/i18n/fr-FR.json';
import de from '@/services/i18n/de-DE.json';
import hi from '@/services/i18n/hi-IN.json';

export default function RootLayout() {

    // Our imported language resources
     const resources = {
        en,
        pt,
        ru,
        zh,
        de,
        es,
        fr,
        hi,
    };

    // State to track if we've initialized i18n
    const [ languageLoaded, setLanguageLoaded ] = useState(false)
    // Our language (locale) to use
    const [ language, setLanguage ] = useState<string | null>()

    // ....other code

    useEffect(() => {
        // We either don't have a language, or we've already initialized
        if (!language || languageLoaded) return;
        i18n.use(initReactI18next).init({
          compatibilityJSON: 'v3',
          resources,
          lng: language,
          fallbackLng: 'en',
        });
        setLanguageLoaded(true);
    }, [language, languageLoaded]);

    useEffect(() => {
        // I realize we don't need this to be async, but I'll get to why in another article.
        const getSystemLanguageAndSet = async () => {

            // Check for a stored locale and set it
            const storedLocale = await AsyncStorage.getItem('hundred_locale');

            // Get the device's current system locale from expo-localization
            const phoneLocale = Localization.getLocales()?.[0]?.languageTag ?? 'en-US';

            // set the stored locale if it exists - else set the system locale
            setLanguage(storedLocale ? storedLocale : phoneLocale);
        };

        getSystemLanguageAndSet();
    }, [])

    // ...other code

    // We don't want to load the app until everything is initialized
    // You'll probably be loading other things like fonts and assets too
    if (!languageLoaded) {
        return null
    }

    return <App />
}
The main change is in the useEffect. We check local storage and then set that value into state if we have it. Else we just use the system setting like we did before. And that's it!
We created a custom i18n context and a custom UI to change the locale from within our app. We also kept the original method of using the device's language preference.
If I've missed anything or if you have any questions, please leave a comment. Let me know if you'd like to see more React Native articles like this. I enjoy interacting with readers!
Thanks for reading! Cheers. 🥂